Instructions I Dive Bar Bottle Wick Holder I MONS


Original instructions I Dive Bar Bottle Wick Holder I MONS™
Please bookmark for future reference
Name: Dive Bar Bottle Wick Holder
Product code: MONS/1558/02
Product code: MONS/1558/02
Material: copper/aluminium/steel/cotton/glass fibre
Made in: England

Dear Customer
Whether you’re lighting up the night with mates or savouring a solo
moment, we hope your purchase meets your expectations and brings you joy.
Product Age Suitability
This product is intended for use by persons 18 years and over.
**Before Use**
Please read and follow the instructions, as well as the rest of the user guide,
carefully before using the MONS Belgium Bar Bottle Wick Holder for the first time.
Items Required
1 spouted jug/beaker. 1 lighter. Water. 1 marker pen. Candle/lamp oil. 1 bottle.
Bottle Compatibility
Refer to the Bottle Compatibility Information section of the user guide.
Fuel Type
Candle/lamp oil (not supplied).
Refer to the Candle/Lamp Oil Information section of the user guide.
Notes, Cautions, and Warnings
Throughout the user guide, when necessary, we use Notes, Cautions
and Warnings to make you aware of safety considerations.
Note: Provides important information for optimal product use.
Caution: Indicates potential product issues or how to avoid them.
Warning: Alerts to potential property damage, personal injury, or serious risk.
Important User Notes
The seal on the metal cap has been intentionally removed.
Prepare a dive bar bottle candle on a hard, flat surface.
A dive bar bottle candle only needs to be filled with water once.
Each candle/lamp oil refill lasts approximately 5–8 hours.
Candle/lamp oil floats on top of water.
A dive bar bottle candle only needs to be filled with water once.
Each candle/lamp oil refill lasts approximately 5–8 hours.
Candle/lamp oil floats on top of water.
Water and candle/lamp oil will not mix.
The cotton/glass fibre wick never needs trimming.
4 Rules to Remember
Always leave empty space at the top of all bottles.
Do not set the wick higher than the recommended height.
Do not remove the wick from the wick holder.
Do not allow the wick to touch the water inside the bottle.
Do not set the wick higher than the recommended height.
Do not remove the wick from the wick holder.
Do not allow the wick to touch the water inside the bottle.

GETTING STARTED: 4-Step User Instructions
Step 1 of 4: Inspect and Rinse the Bottle
Bottle Inspection: Hold the bottle up to a light source and inspect it closely from
top to bottom for any signs of damage, such as cracks or chips. If you find any
damage, however minor, do not use the bottle. Bottle Rinse: Rinse the inside of
the bottle with warm or cold water. No need to dry the inside afterward.
Step 2 of 4: Set the Wick Height
Setting the correct wick height is essential for a well-functioning dive bar bottle
Setting the correct wick height is essential for a well-functioning dive bar bottle
candle. Wick Height: Position the wick inside the wick holder so it extends 1-2mm
above the holder. This wick height will produce the ideal flame height of approximately
1.5cm. To adjust, gently push or pull the wick from underneath the wick holder.
Caution: Do not exceed a 2mm wick height, as this will cause the flame to
stretch and produce smoke. Caution: Take care not to pull the wick entirely out of the
wick holder when making adjustments.
Refer to the illustration below for guidance.

Step 3 of 3: Placing the Wick Holder on the Bottle
Wick Holder Placement: Push the wick holder onto the bottle. Ensure it meets
Wick Holder Placement: Push the wick holder onto the bottle. Ensure it meets
these criteria: 1. It clicks onto the bottle mouth. 2. It rotates freely around the bottle
mouth. 3. It moves slightly up and down on the bottle mouth. 4. It moves slightly
from side to side on the bottle mouth. 5. The wick material is straight.
Testing the Wick Holder's Fit. Gently pull on the wick holder cap to check its security.
If it remains on the bottle, it is a secure fit. If it comes off, adjustments are needed to
make it a tighter fit on the bottle. Follow the instructions below to adjust the wick holder.
Adjusting the Wick Holder (If Necessary). With the wick holder on the bottle, use the
Adjusting the Wick Holder (If Necessary). With the wick holder on the bottle, use the
edge of a coin to gently press in four tabs on the metal cap. Repeat if necessary until the
wick holder fits securely.
Refer to the illustration below for guidance.

After adjustment
Ensure the wick holder still meets these criteria: 1. It clicks onto the bottle mouth.
2. It rotates freely on the bottle mouth. 3. It moves slightly up and down on the bottle
mouth. 4. It moves slightly from side to side on the bottle mouth. 5. The wick material
is straight.
Mark the Wick Position
Now that the wick is set to the correct height and the wick holder fits properly on the
bottle, follow these steps to mark the wick position inside the bottle: 1. With the
wick holder on the bottle, using a marker pen, draw a mark on the outside of the bottle,
approximately 2cm below the end of the wick inside. 2. Once marked, remove the
wick holder by pushing it upward to release it from the bottle, and set it aside.
Refer to the illustration below for guidance.

Final Step. Step 4 of 4: Fill the Bottle with Water and Candle/Lamp Oil
Water Filling: Using a spouted jug or beaker, tilt the bottle slightly and slowly fill it
with water. Stop filling once the water level reaches the pen mark on the outside of
the bottle. Filling slowly and precisely will help ensure success.
Refer to the illustration below for guidance.
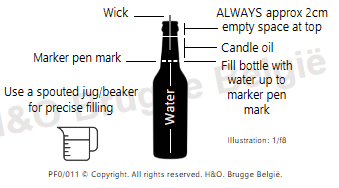
Candle/Lamp Oil Filling
Add Candle/Lamp Oil: Drip a small amount of candle/lamp oil into the bottle,
leaving about a 2cm empty space at the top of the bottle neck.
Check Wick Height: Confirm that the wick is set to the correct height within the
wick holder, then click the wick holder onto the bottle. Allow 20 seconds for the
wick to absorb the candle/lamp oil before lighting.
Observe Flame: Light the candle and observe the flame as it stabilises. Adjust if
necessary.
Adjust Wick Height (if necessary): Adjust the wick height to achieve the ideal
flame height of around 1.5cm. Warning: Ensure the wick holder has fully cooled
before adjusting the wick height.
Additional Notes
Empty Space: Leaving empty space at the top of the bottle neck helps the candle
breathe properly and function as intended.
Ideal Flame: The ideal flame burns steady and calm, without stretching or erratic
movement.
movement.
Pouring Candle/Lamp Oil: For precise pouring, use a small plastic spouted medicine
cup or similar type vessel. The smaller the vessel, the easier and more accurate the pour.
Excess Lamp Candle/Oil: If the bottle is overfilled with oil, use a twisted piece of
kitchen roll to absorb the excess. Warning: Dispose of used kitchen roll safely,
out of reach children and animals.
Refill the Candle with Candle/Lamp Oil: Place the extinguished candle on a hard,
flat surface. Remove the wick holder and set it aside. Refill: Add candle/lamp oil to
the bottle neck, again leaving about 2cm of empty space at the top. Replace Wick
Holder: Confirm the wick height is set correctly and return the wick holder to the
bottle. Warning: Ensure the wick holder has fully cooled before handling.


EC/C/675 Pub V1.2.E-EN-E-July 2021 Supersedes Pub V1.2.E-EN-E-Jan 2020. © 2025 Copyright. All Rights Reserved.
